Particle Picking by Template Matching
Here we are going to work with cytosolic ribosomes.
For reference, here a low-resolution depiction of a ribosome, with the large subunit colored in blue and the small subunit colored in yellow (with the head and the body colored differently)
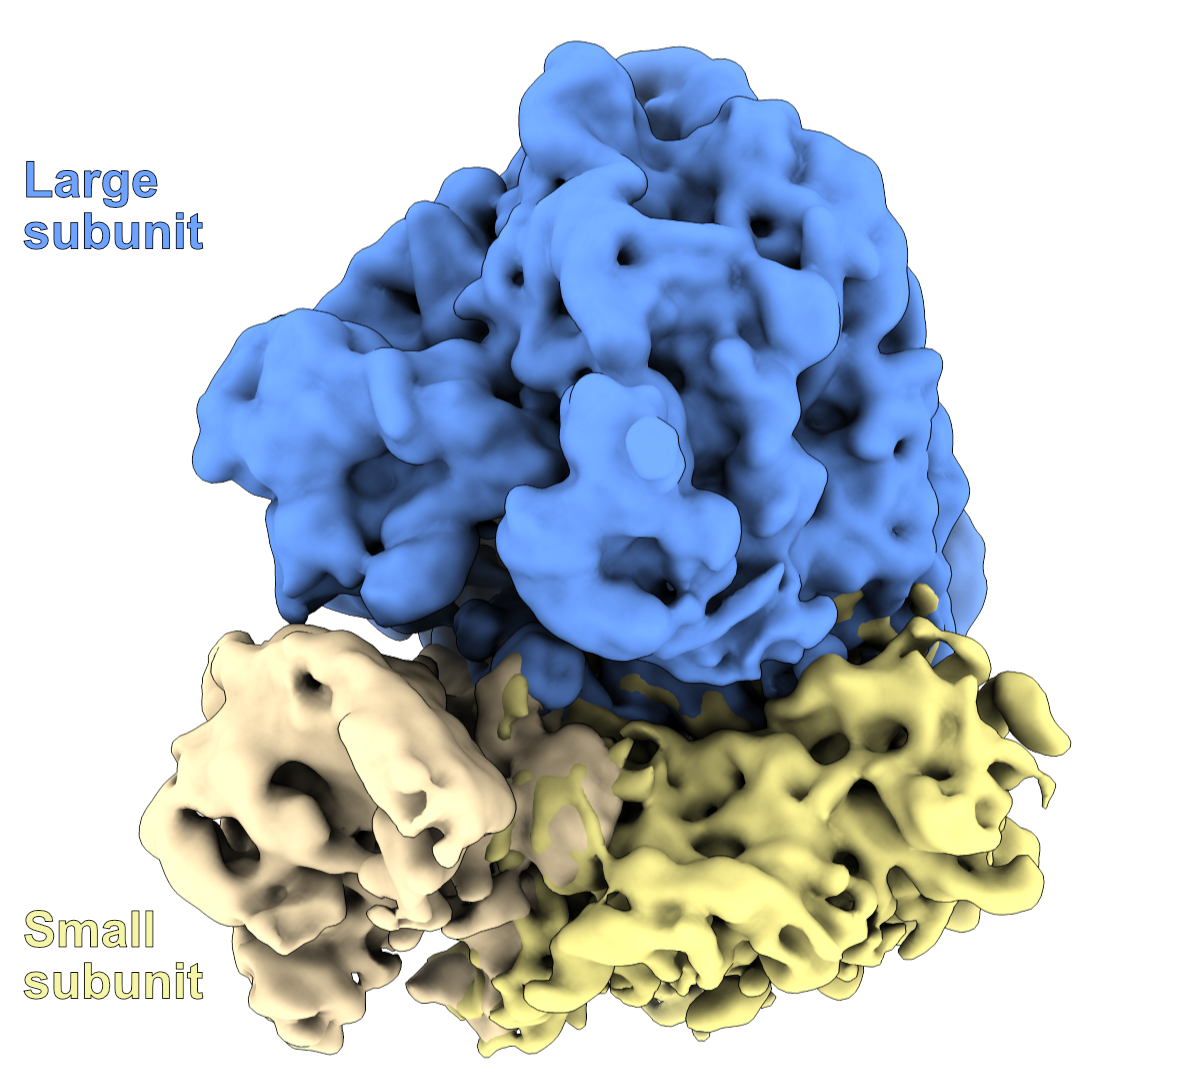
Table of Contents
- Create boundary masks of your tomograms
- Template matching using pytom-match-pick
- Running template matching on AreTomo3 tomograms
- Extract particles
- Check your particle positions with IMOD
- Combining your particles
- Visualisation in ChimeraX using ArtiaX
- Alternatives to template matching
Create boundary masks of your tomograms
To restrict particle extraction (or detection) to your lamella only, and not the entire tomogram, you might want to use a “slab mask” or a boundary mask. This is particularly useful on difficult targets to minimise the number of false positive picks.
In our case with ribosomes, a slab mask is actually not really necessary. You can automatically create a boundary masks using Slabify. This works best on denoised tomograms. For detailed instruction check the Slabify Wiki.
If you know where you particle should be (e.g mitochondria, nucleus etc) you can further restrict your search by creating appropriate masks with software like Amira, Napari, MITK - or using automated membrane segmentations tools like MemBrain-seg.
You can make a slab_mask folder inside the tomograms folder (e.g RELION5/Tomograms/jobXXX/tomograms/) for example.
Template matching using pytom-match-pick
You should have tomograms for example from RELION5 or AreTomo3. Make sure you have pytom-match-pick installed. Set up a template matching folder in the root RELION working directory (e.g RELION5/project/template_matching).
You will need to have:
- A template at the correct pixel size. Here, we first use a SPA structure with matching pixel size, correct box size, and inverted contrast (black density on white background)
- A template mask with the same properties. It can also just be a sphere, but it is not recommended here.
For more details, check the Documentation. Generally, we recommend using a template that was generated from the data. This gives much better results.
Hence, template matching is also an iterative process. For challenging targets, you want to rerun everything once you obtain a “low-res” (ideally bin4 Nyquist) structure from your data.
From the download, you can directly retrieve Ribosome templates and masks which we have prepared. Shown here, on the left, the volume Cytoribo_box72-inv.mrc with inverted contrast, is the one to use for template matching, on the right the “normal” contrast volume, Cytoribo_box72.mrc
If you want to create your own template from a map you can follow the section below.
Scaling a template using RELION or EMAN
Scaling an input.mrc file from the EMDB can be done, for example, using either e2proc3d.py from EMAN2 or relion_image_handler from RELION:
e2proc3d.py input.mrc output.mrc --scale=0.2 --process=filter.lowpass.gauss:cutoff_freq=0.1 --clip=84,84,84
relion_image_handler --i input.mrc --o output.mrc --rescale_angpix 7.64 --new_box 84 --force_header_angpix 7.64
--scale=0.2: Rescale the pixel size by a facor of input/output so here 5 for example.process=filter.lowpass.gauss:cutoff_freq: Lowpass filter as 1/Resolution. Here, 10 Å for example. Best to just filter to the binning Nyquist resolution for “high-res TM”.new_boxorclip: Boxsize (in pixels). See good box sizes.force_header_angpix: There might be some discrepancy between the desired and actual pixel size from the way RELION scales the image. We force the header to the desired pixel size.
Running template matching on RELION5 tomograms
To run template matching in batch (on all the tomograms in your RELION folder), we will use this batch_pytom_wRln5 script we wrote. It is intended to create bash.sh files for SLURM submission. It will read all necessary information like the defocus per tilt and exposure values from the tilt-series.star files in your RELION Tomograms/jobXXX/ folder. For each tomogram, those values will be provided to the pytom_match_template.py script. Alternatively, as always, you can just run template matching using pytom in the conventional way. Our scripts are intended to facilitate the batch submission of jobs in case you want to template match hundreds of tomograms.
For ribosomes, good results were obtained using:
- Angular search: 10°
- Enable random-phase correction: YES
- Enable per-tilt-weighting: YES
- Are the tomograms CTF corrected: YES
- Enable non-spherical mask: YES
- High-pass filter: 400
An example of how to run the script:
python batch_pytom.py \
  --mrc-dir path/to/Tomograms/jobXXX/tomograms \
  --star-dir /path/to/Tomograms/jobXXX/starfiles \
  -t /path/to/template.mrc \
  -m /path/to/mask.mrc \
  [--particle-diameter 140 | --angular-search 7] \ # either or - here --angular-search 10 is good
  -s 2 2 1 \
  --voxel-size 7.64 \
  -g 0 \
  --random-phase-correction \
  --rng-seed 69 \
  --per-tilt-weighting \
  --non-spherical-mask \
  --tomogram-ctf-model phase-flip \
  --high-pass 400 \
  ---bmask-dir path/to/the/folder/with/masks/ # if you have one \
  [--dry-run] # to just create the submission scripts without launching them
Note: many flags are set to default values like the voltage 300 kV, amplitude contrast 0.07, and SLURM settings like the partition emgpu (name of our SLURM partition). So, make sure you check
batch_pytom.py --helpfor information about the input flags.
An example output of one of the generated submission files might look like this:
#!/bin/bash -l
#SBATCH -o pytom.out%j
#SBATCH -D ./
#SBATCH -J pytom_1
#SBATCH --partition=emgpu
#SBATCH --ntasks=1
#SBATCH --nodes=1
#SBATCH --ntasks-per-node=1
#SBATCH --cpus-per-task=4
#SBATCH --gres=gpu:1
#SBATCH --mail-type=none
#SBATCH --mem=128G
#SBATCH --qos=emgpu
#SBATCH --time=05:00:00

ml purge
ml pytom-match-pick

pytom_match_template.py \
  -v job017/tomograms/rec_Position_1.mrc \
  -a submission/tomo_1/1.tlt \                               # read from .star file
  --dose-accumulation submission/tomo_1/1_exposure.txt \     # read from .star file
  --defocus submission/tomo_1/1_defocus.txt \                # read from .star file
  -t tmpl.mrc \
  -d submission/tomo_1 \
  -m mask.mrc \
  --angular-search 10 \
  -s 2 2 1 \
  --voxel-size-angstrom 7.64 \
  -r \
  --rng-seed 69 \
  -g 0 \
  --amplitude-contrast 0.07 \
  --spherical-aberration 2.7 \
  --voltage 300 \
  --per-tilt-weighting \
  --tomogram-ctf-model phase-flip \
  --non-spherical-mask \
  --high-pass 400 \
  --tomogram-mask masks/bmask_1.mrc                           # from Slabify, for example
If you don’t have an HPC or don’t use SLURM, you can just run the regular pytom-match-pick similar to the command above. You can run batch_pytom.py with the flag --dry-run in order to generate all the input commands and flags to then run it the way you like while still having all the tilt, defocus, and exposure information read correctly from the RELION .star files.
Some numbers: ~40 min per subvolume (tomogram is split in 4) so 2.5 to 3h per tomo with 7° angular sampling at bin4 on rtx4090 node (we could have ask for more resources of course). 1.5h when you use the same parameters but a 10° (testing 15000 angles) angular sampling instead of 7° (testing 50000 angles). Random-phase correction will basically double the computation time, but we recommend using it, especially for more challenging targets.
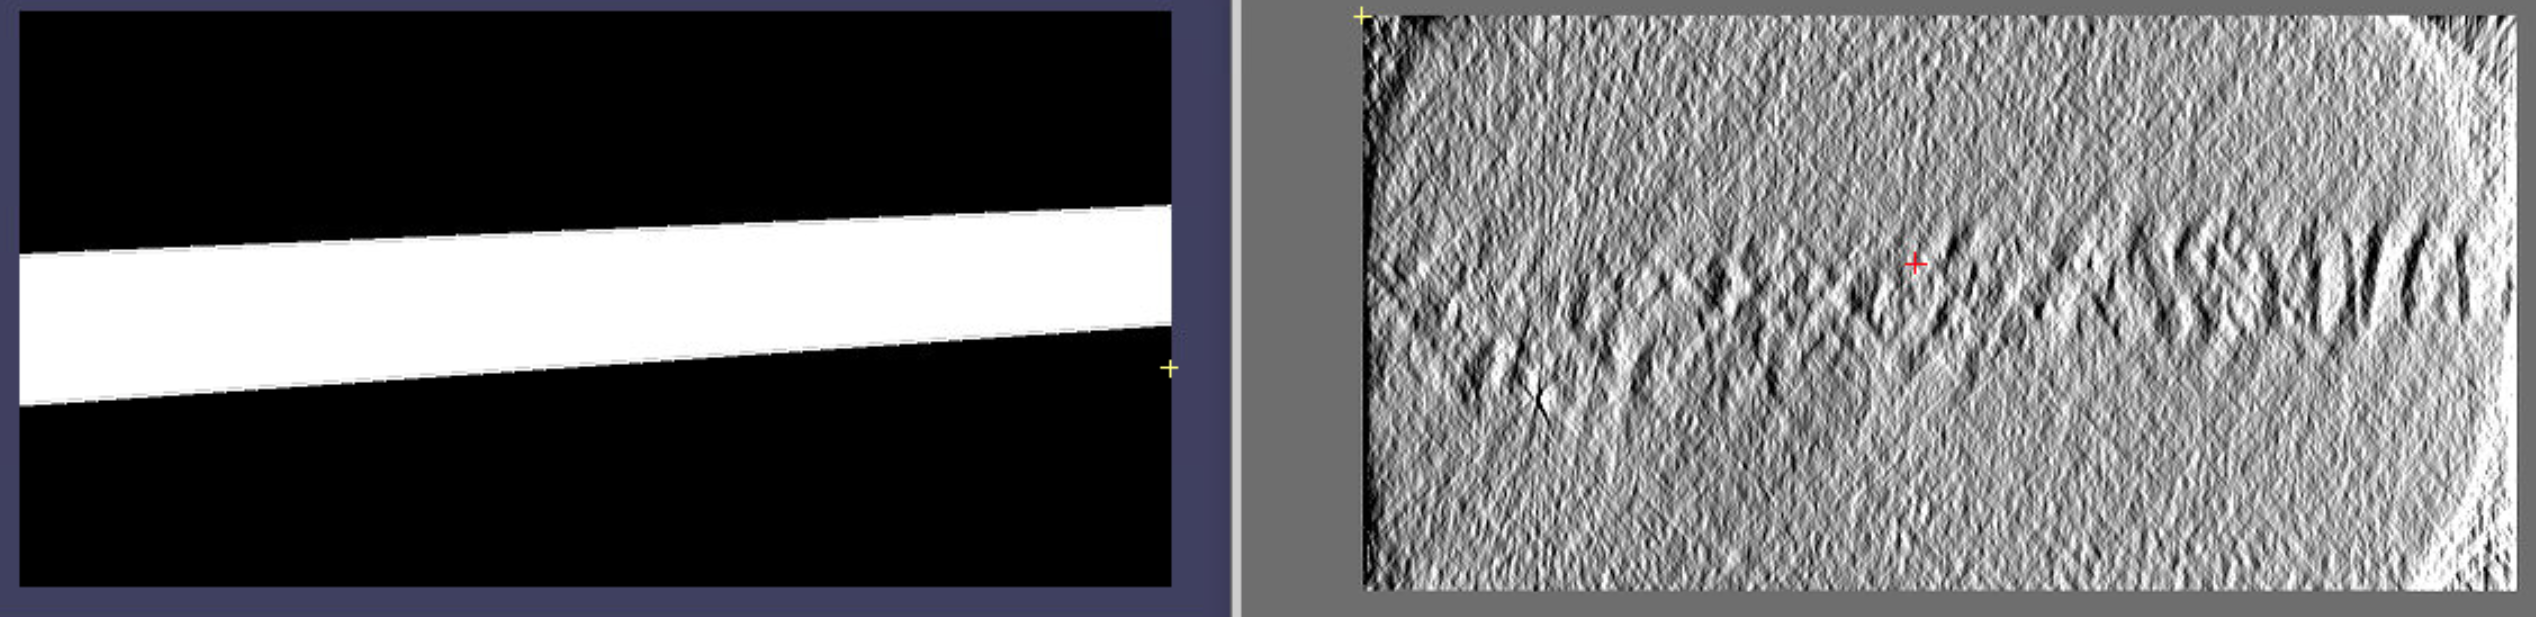
You can check the _scores.mrc file in IMOD for example to already see if template matching was successful. If you open the tomogram.mrc and _scores.mrc at the same time you should see bright dots at the center of each of your particles of interest. Later in this section, we’ll show you how to visualize your particles first with IMOD, and then more appealingly using ChimeraX & ArtiaX.
Running template matching on AreTomo3 tomograms
Similarly, if you have reconstructed your tomograms using the AreTomo3 pipeline, we have a batch_pytom_aretomo3 script. This will also create submission files for template matching using the tilt and CTF information from the AreTomo3 outputs. Your output folder should look something like:
aretomo3/
├─ AreTomo3_Session.json
├─ TiltSeries_Metrics.csv
├─ TiltSeries_TimeStamp.csv
├─ Position_1.aln
├─ Position_1.mrc
├─ Position_1_ODD.mrc
├─ Position_1_EVN.mrc
├─ Position_1_Vol.mrc
├─ Position_1_CTF.txt
├─ Position_1_TLT.txt
├─ Position_1_CTF_Imod.txt
├─ Position_1_Imod/
│   ├─ Position_1_st.tlt
│   ├─ Position_1_st.xf
│   └─ Position_1_order_list.csv
├─ Position_2.aln
├─ Position_2.mrc
...
The functionality of the batch submission script is basically the same as for the above RELION5 one. Make sure to check the --help and the Github README and feel free to raise any issues or comments directly on the GitHub page. Alternatively, as always, you can run pytom with template matching just using the conventional way. Our scripts are intended to facilitate the batch submission of jobs in case you want to template match hundreds of tomograms.
Extract particles
Once you have succesfully run template matching, you can extract your particles with pytom_extract_candidates.py. This will create the particles.star in RELION5 format to then use for subtomogram averaging. Again for detailed explanation check the documentation or --help of the pytom script.
You can extract from multiple tomos, for example, via SLURM like:
#!/bin/bash -l
#SBATCH -o pytomextract.out%j
#SBATCH -D ./
#SBATCH -J pytom
#SBATCH --partition=emgpu
#SBATCH --ntasks=1
#SBATCH --nodes=1
#SBATCH --ntasks-per-node=1
#SBATCH --cpus-per-task=4
#SBATCH --gres=gpu:1
#SBATCH --mail-type=none
#SBATCH --mem 64G
#SBATCH --qos=emgpu
#SBATCH --time=06:00:00

ml purge
ml pytom-match-pick

pytom_extract_candidates.py -j submission/tomo_24/rec_tomo24_job.json --particle-diameter 300 -n 800 -c -1 --relion5-compat
pytom_extract_candidates.py -j submission/tomo_25/rec_tomo25_job.json --particle-diameter 300 -n 800 -c -1 --relion5-compat
pytom_extract_candidates.py -j submission/tomo_34/rec_tomo34_job.json --particle-diameter 300 -n 800 -c -1 --relion5-compat
pytom_extract_candidates.py -j submission/tomo_35/rec_tomo35_job.json --particle-diameter 300 -n 800 -c -1 --relion5-compat
Automatically select X best positions (determined cutoff by pytom) with a maximum number of 5000 particles:
pytom_extract_candidates.py -j submission/tomo_24/rec_tomo24_job.json --particle-diameter 300 -n 5000 --relion5-compat
Force select the top 800 positions:
pytom_extract_candidates.py -j submission/tomo_24/rec_tomo24_job.json --particle-diameter 300 -n 800 -c -1 --relion5-compat
or you can investigate the .svg file that was generated from the extraction job. Based on this you can tweak your -c value.
Check your particle positions with IMOD
We wrote a script called rln2mod which will create IMOD .mod point models from your particle.star files in RELION5 format. You will need to have IMOD loaded since it will run point2model. The script will output .mod files for all .star files in the directory it is run from:
rln2mod.py --x 1024 --y 1024 --z 512
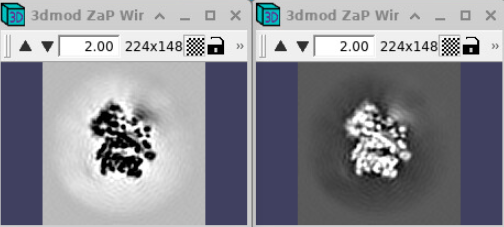
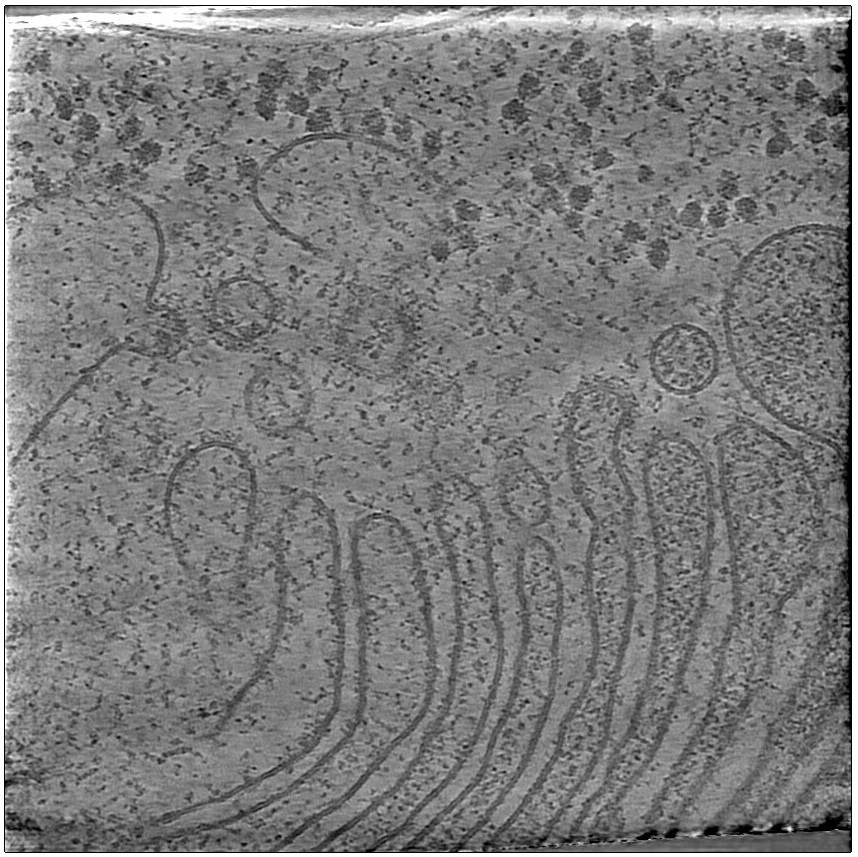
Just give the tomogram dimensions in pixels as input. Then you can open your tomogram.mrc and .mod together in IMOD. A trick for better visualisation is to go to: Edit > Object > Type > Sphere radius for point and increase this value! Here, an example from reconstruction in AreTomo with refined thickness and with default pytom extraction parameters using a high-pass filter of 400. Shown in in IMOD XYZ mode (ctrl + X):
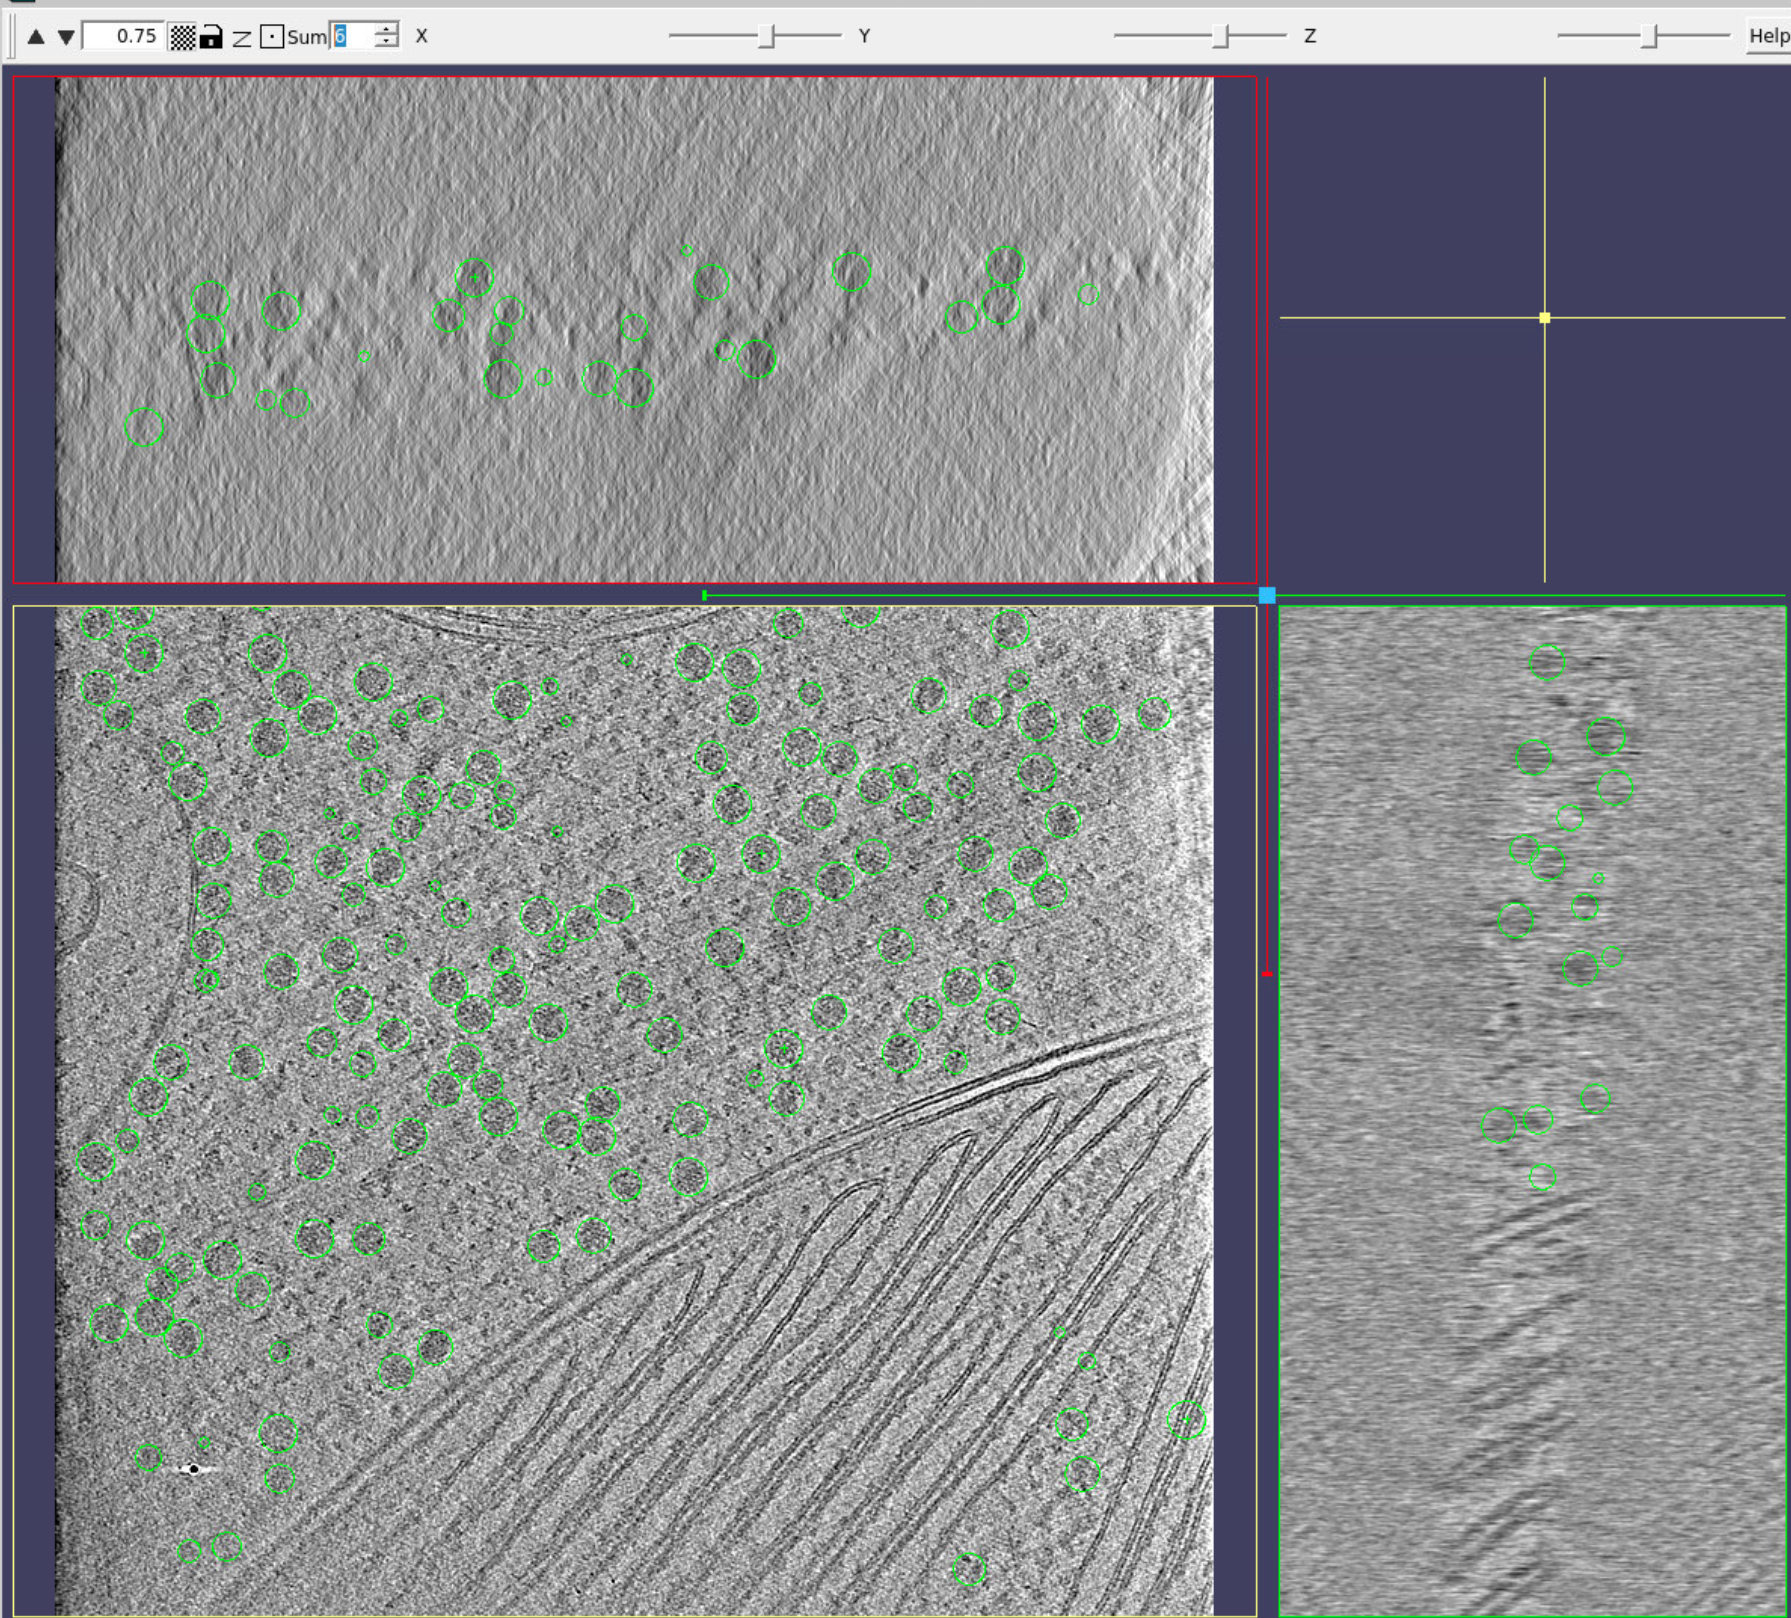
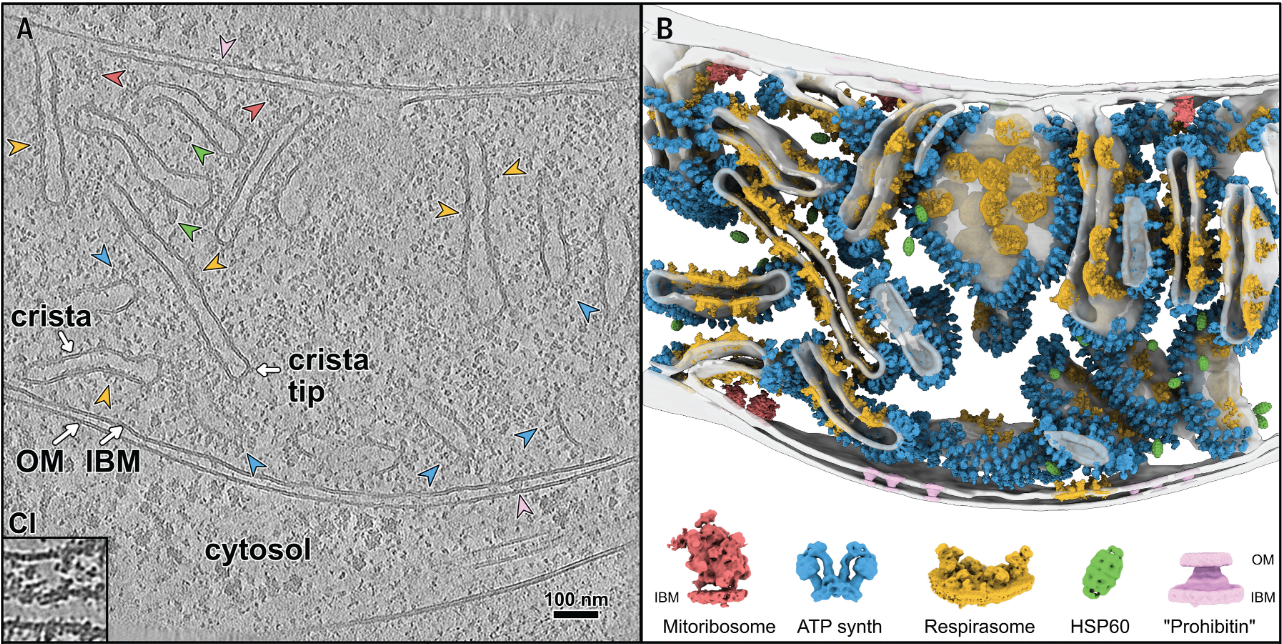
A total of 546 positions were extracted. The particle picking is nearly perfect, with only a few false positives occurring on thylakoid membranes or chloroplastic ribosomes, which closely resemble cytosolic ribosomes. The boundary mask was applied for selection, you can see that nothing has been picked outside of the tomogram volume.
Common problems that can occur:
- Particles extracted miss true positive particles: can be fixed by (slightly) increasing the number of particles
-nand forcing this number with-c -1. - Particles extracted include false positives: this is more often the case. Because membranes, ice contamination, or other high contrast object cross-correlate with a high score as well.
The latter might not pose a problem if you believe you can easily trash them through classification in the later stages of STA. You can improve your particle picks by using a mask that only covers the cytosol and excludes the chloroplast instead of a simple boundary mask. You can even provide this mask during the extraction job. This will yield optimal results as you only extract particles in the areas you expect them to be. However, this requires you to create the masks in the first place and can be tedious when you work with tens or hundreds of tomograms. Approaches like Pom or other automated volume segmentations or many-feature segmentations could overcome this bottleneck. We have not tested such approaches thoroughly enough, though. You can also try to play with pytom parameters like the high-pass. We used a value of 400; you can use smaller values, but be careful that at some point, you will lose the true positive signal. The number of particles you want extracted is always tricky to decide. Of course, you ideally want to pick “everything”, i.e. all the true positives. In reality, if you want to pick “everything”, you will probably have to “overpick” and include false positives. Luckily, you will have the chance of cleaning them out in the later stages. If you “underpick”, there are high chances that you will minimise the number of false positives and only select your particles of interest. This is useful when you want to quickly generate an average from your own data. This is ALWAYS a good idea when doing template matching. Because using a template generated from your data will always give better results than a template coming from, e.g an SPA map or molmap in ChimeraX from a PDB (worst).
Combining your particles
Finally, once you are satisfied with the template matching results, you can generate a “master” .star file that will contain all the particle positions for all the tomograms. To do so, you can use the pytom_merge_stars.py script included with pytom. Run it from a folder containing all your .star files. It will automatically merge particle lists present in the directory
When importing to RELION5, make sure a prefix such as rec_ is not present in the rlnTomoName field of your merged particles.star file. Otherwise, do a quick find-and-replace to remove this prefix.
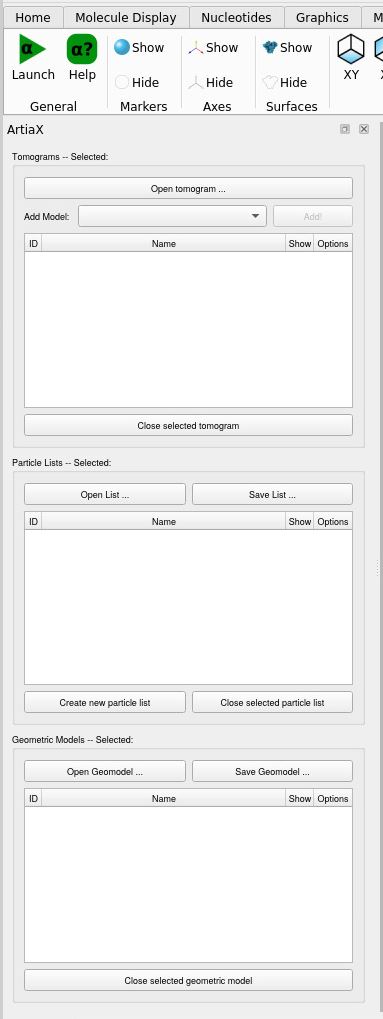
Visualisation in ChimeraX using ArtiaX
We will show you how to use the ArtiaX plug-in in ChimeraX. This allows you to not only check the position but also the orientation of particles.
This is also what we use to create these figures:
Here is a short step-by-step guide on how to open your particles in ArtiaX.
Once you’ve installed ArtiaX, you should have these options available on the top window:

Press on Launch on the left, you should now have these windows
You can open the tomogram of your choice, and it will open
On the right, you have the ArtiaX options, you can play with the two first sliders to change the contrast, and the last slider let you go through Z.
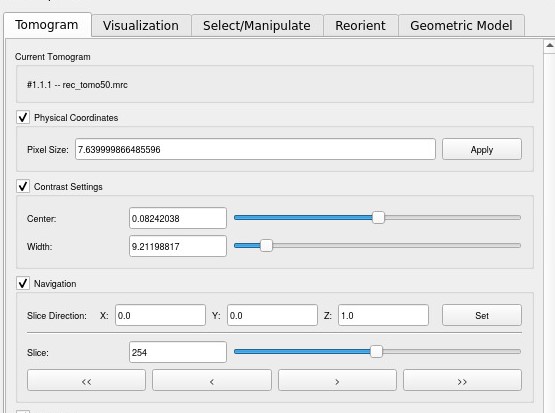
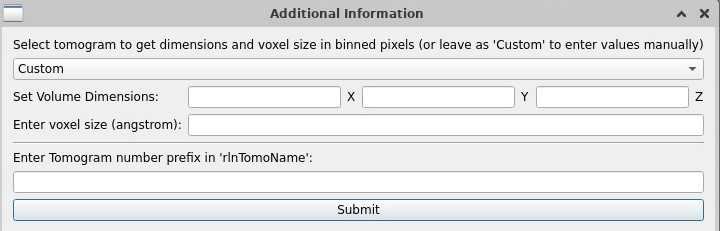
To open a particle list, select Open List, choose your list (it needs to be a RELION5 particle list), and this window will pop up. Click on custom and select the tomogram, and it will adapt the dimensions.
If you have a particle list with particles from several tomograms (e.g a concatenated particle list after template matching), you’ll want to display only the particles from your tomogram of interest (here tomo50).
On the left, go to Select/Manipulate, and Add selector. Choose rlnTomoName, and select only the tomogram you want (here 50)
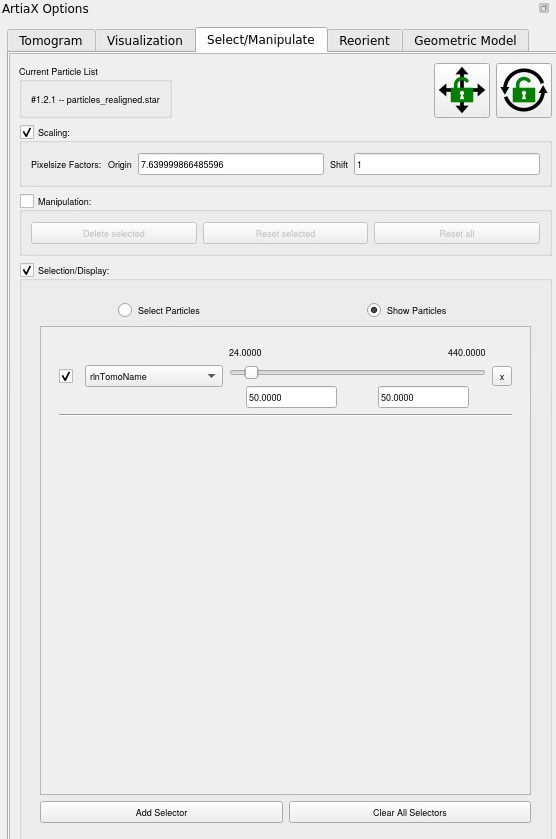
Now, only the particles from tomogram 50 are visible:
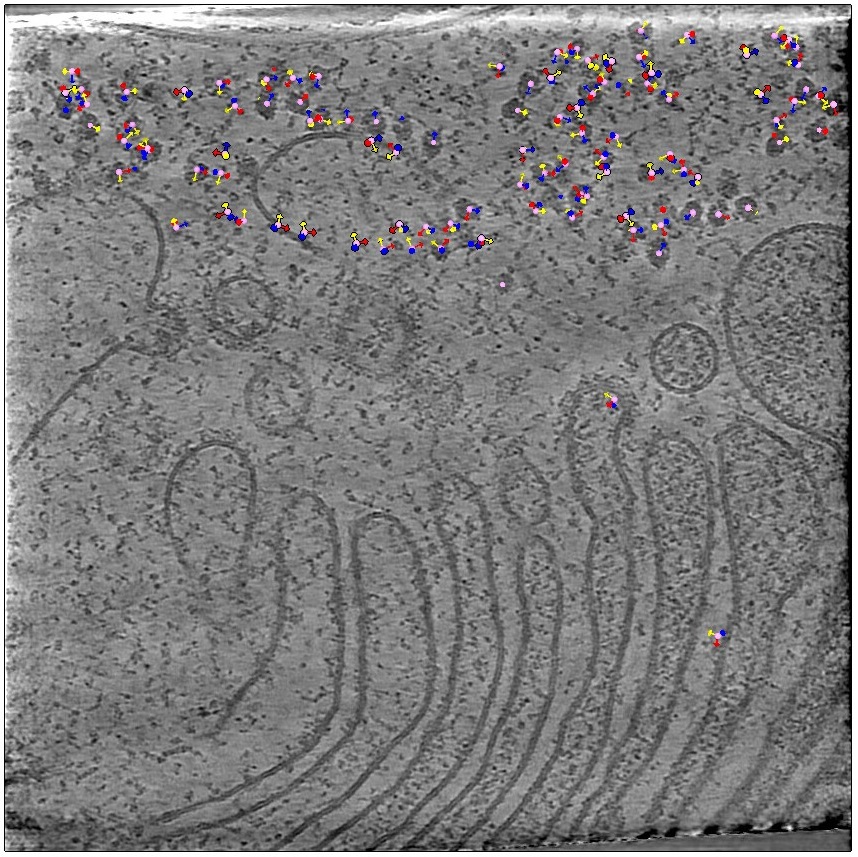
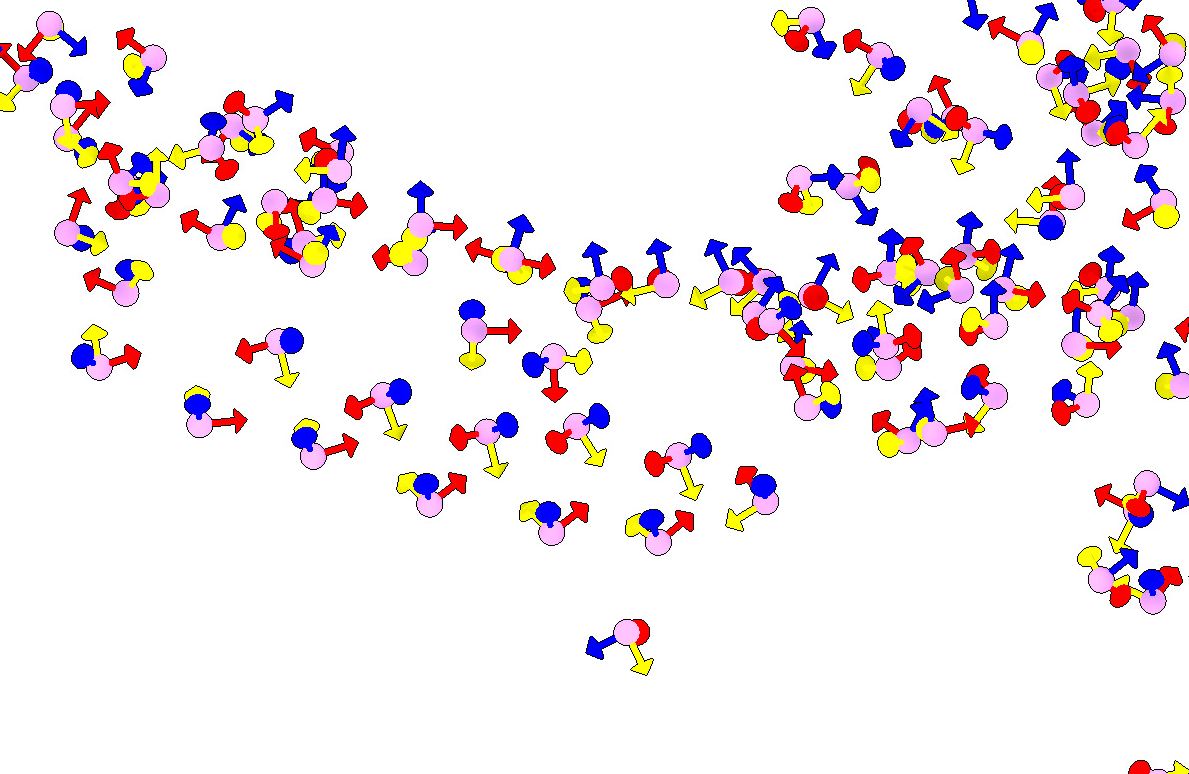
The centre of the particles is represented by balls, and their orientation by the arrows. However, you see all particles from all the slices are represented, you can change it by pressing Clip on the top. Now only the particles close (in Z) to the plane you are looking at will be visible. Easier for inspection.
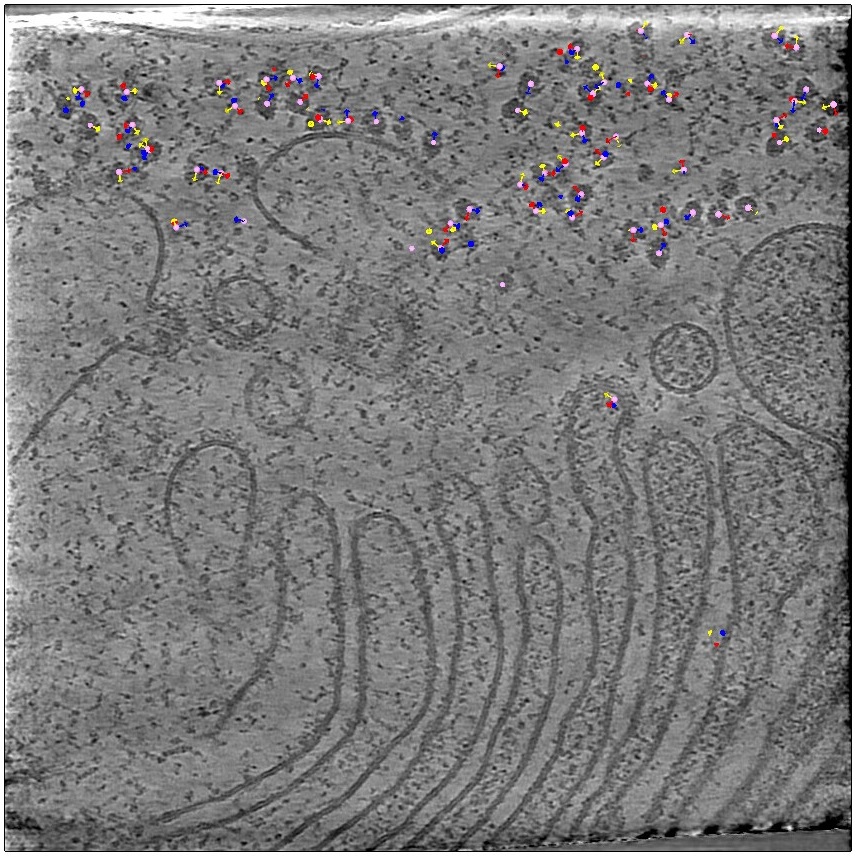
You can also hide the tomogram and just look at the particles. Here, for example, you can see a pattern; these particles appear to all be oriented the same way.
Let’s try to attach a volume to these particles, to have a better idea of what is happening. On the left window, Open Geomodel (a .mrc volume, for example, the template used for template matching, or the volume you obtained during STA) Then on the right, on the Visualisation tab, at the bottom, on the Add new surface part, click on Attach Model. Now we have ribosomes! You can play for the Surface Level to make it nice.
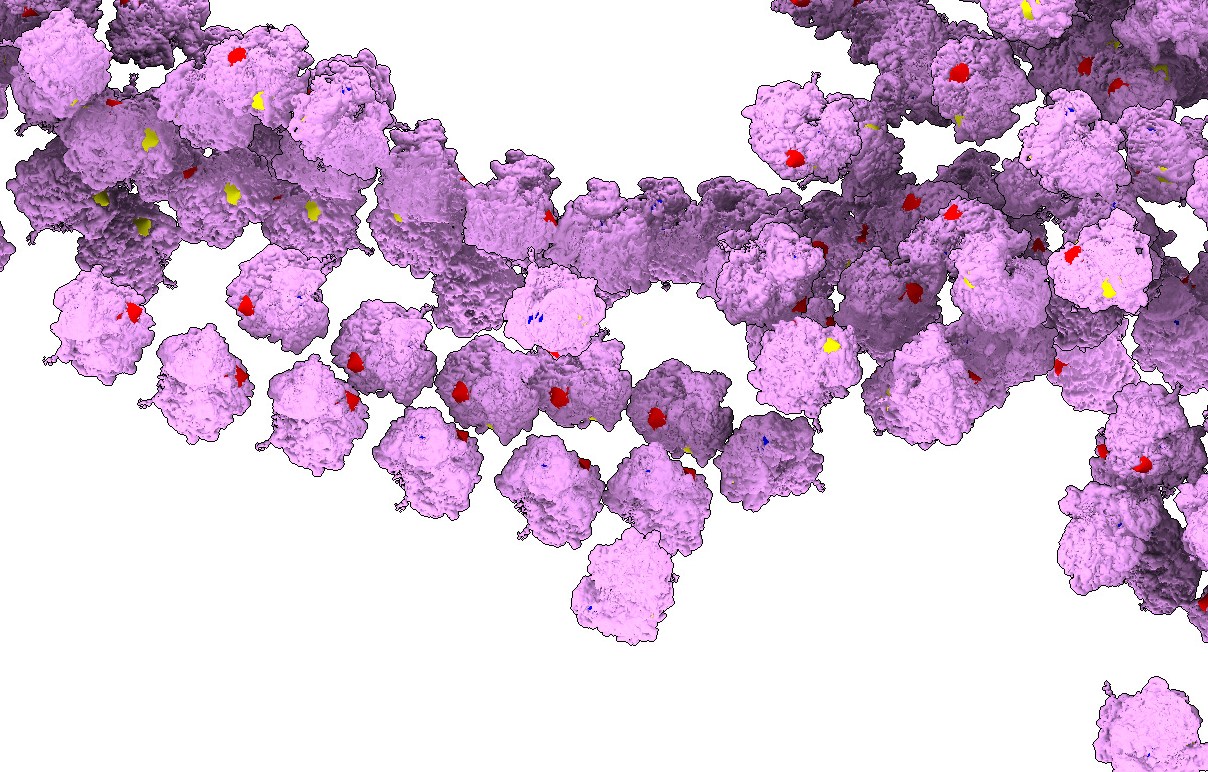
Here you can see that many of them are nicely organised, these are ER-bound polysomes.
You can also open multiple particle lists from multiple complexes as well as membrane segmentation, to understand how all these thing are organized in 3D, and to create nice figures.
Alternatives to template matching
While template matching is a standard method, several alternative approaches have been developed for identifying macromolecules within a dense cellular environment. Especially, in the case where you don’t know what your particle looks like, template matching falls short.
Manual Picking
- If you can recognise your particle of interest in the tomograms, you can manually select them in IMOD or with ArtiaX
Machine Learning-Based Methods
- TomoTwin: Employs deep metric learning to embed tomograms into a high-dimensional space, enabling the identification of proteins without the need for manual annotation or retraining for each new protein.
- crYOLO: A convolutional neural network-based tool that applies the YOLO (You Only Look Once) object detection system for fast and accurate particle picking. It offers pre-trained models and supports training on user-specific datasets.
- ProPicker: A promptable segmentation method that allows for selective detection of specific proteins in cryo-ET tomograms, facilitating targeted particle picking.
- and many more!
Geometry-Based Methods
- MPicker: Focuses on membrane-associated particles by generating flattened tomograms to reduce membrane curvature, enhancing the visualisation and localisation of proteins on membranes.
- MemBrain-pick: Part of the MemBrain suite, this tool utilises pre-existing membrane segmentations to localise membrane-associated particles. It converts segmentations into mesh representations, which can be manually annotated using Surforama to train models for particle prediction.